Additive and Subtractive Color
http://www.sanford-artedventures.com/study/g_color_wheel.html
http://www.sanford-artedventures.com/study/g_color_wheel.html
Color Mixing - William F. Powell
Some General Guidelines
Some General Guidelines
Mixing:
The goal of this exercise is to get better acquainted with the paint in your supply kit as well as to begin developing effective skills and techniques that will be vital to your success in this class. You will need to learn how paint behaves and to better understand how you work best with it. Patience and concentration along with care will be essential to the discipline needed for this class. Once you’ve developed the necessary techniques, the work itself will be very easy to complete.
Some tips for effective mixing:
• Use care and patience
Take your time and concentrate on how the paint behaves in order to keep the paint flat and opaque. Aim for “computer print-out” or cut paper flat.
• Keep your paint mixtures consistent and smooth. Each tube may be different (thick or thin). You may need to mix a little water to keep thicker paint from appearing too lumpy. Avoid making it too watery or it will look transparent and streaky.
• Keep your brushes and water clean. Never use dirty water when mixing and always use your palette knife to mix, not brushes.
• Tape off shapes with removable tape (Scotch works well) in order to keep edges clean
• Always work in well-lit areas. Daylight is best or a combination of window/electric light is good. Certain light bulbs including fluorescents will make the color seem different.
• Remember paint usually dries darker. It always looks more vibrant and light when wet. You will need to account for this in future mixing.

Hue
The quality that distinguishes one color family from another, as red from yellow or green from blue
The quality that distinguishes one color family from another, as red from yellow or green from blue
• Hue and color are not synonyms.
Hue has only one dimension, color has three: hue, value and chroma.
Munsell system: 10 basic hue families: 5 major and 5 minor
Major hue families: Red, Yellow, Green, Blue, and Purple
Minor hue families: Yellow-Red (Orange), Green-Yellow, Blue-Green, Purple-Blue, and Red-Purple
• Hue circle- In the Munsell system this is what the circle of hues is referred to as, rather than the color wheel.
• Munsell notation for hue:
The ten hue families can be further subdivided into 10 more hue families. The number 5 designates the center- the most “true” representation of that hue family. The number 10 designates the hue family that is halfway between two adjacent “true” hues. Moving clockwise around the circle it begins with Red 1R, 2R, 3R, 4R, 5R (at the top center), 6R, 7R, 8R, 9R, 10R (yellowish red), 1Y… Even finer subdivisions can be made using decimals.
• Compliments on the hue circle differ from the popular color wheels.
1/23/09
Sketchbook Exercise: In order to work towards building a full color wheel it will be useful for you to have some experience in mixing primary colors to achieve secondary colors. Use a separate page in your sketchbook to mix each of the following secondary colors.
Format:
• Label the top of each page by the exercise: “ Primary to Secondary Mixing”
• Next, list the primary color to be mixed with other primary colors as directed. [For example: Cadmium Red + three yellows (Cadmium Yellow Light, Cadmium Yellow Medium, Yellow Oxide)]

[3. Evenly spaced, 1”x3” grids per page, ]
PIGMENT PRIMARY COLORS:
Red: Cadmium Red Medium
Quinacridone Magenta
Burnt Sienna
Yellow: Cadmium Yellow Light
Cadmium Yellow Medium
Oxide Yellow
Blue: Phthalo Blue
Ultramarine Blue
Page #1 Orange Mix Cadmium Red Medium + three yellow pigments
Page #2 Orange Mix Quinacridone Magenta + three yellow pigments
Page #3 Orange Mix Burnt Sienna + three yellow pigments
Page #4 Green Mix Phthalo Blue + three yellow pigments
Page #5 Green Mix Ultramarine Blue + three yellow pigments
Page #6 Purple Mix Phthalo Blue + three red pigments
Page #7 Purple Mix Ultramarine Blue + three red pigments
1/30/09
Assignment #1
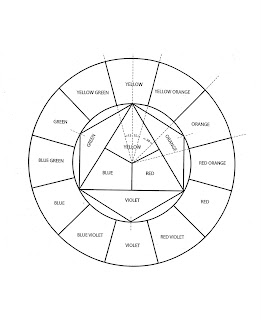
Itten Color Wheel
Directions:
Materials: 11” x 14” Bristol Board, Ruler, Compass, Protractor, Hard Pencil (2H, 4H),
Removable Tape, Xacto knife, Goldens Acrylic Paints, Brushes…
• Find the center of the top edge of your Bristol board and then measure down 7 inches. This point will be the center point of your wheel.
• Define the outer circle of the wheel to measure 10” wide and the inner circle to measure 6” wide; always use a hard 2H or 4H pencil so not to leave an indelible mark.
• From your center point, define a vertical line that spans to the top of your wheel to
create your center line.
• Define the 12 segments of your wheel: start at the centerline and measure and mark 15 degrees to the left and right of the line. This defines your yellow segment.
• The rest of the segments can simply be marked every 30 degrees. Be sure to mark on both the inner and outer circles for each segment so you can connect them in accurate radial lines (even).
• Mark the center point of every other segment after the yellow, along the inner circle. This will help you define the triangles for the center of your design.
• The triangle for the primary and secondary colors touch at the center points of marked segments.
• Be sure the primary triangle is divided evenly by measuring the center of each side and connecting that point to the center point.

The Psychology of Color and Form
2/6/09
Sketchbook Exercise: Research how color and shapes relate to human psychology. Assign a page in your sketchbook for each color in your toolbox. In the corner you will choose a shape to represent this color based on the research you did and your own intuitions. Write down under the painted shape why you chose the shape you chose for the particular color. Save space on each page because it will be used later for your tints and shades when we look at value.
Example:

Some suggest a gray blue shows fear of new ideas, therefore, I chose a cone shapes because it recedes into the base rather than growing out from it.
No comments:
Post a Comment